Leverage Browser Caching là một module hỗ trợ lưu đệm các thành phần tĩnh của website như: hình ảnh, CSS, JavaScript, HTML,.. vào bộ nhớ cache (gọi tắt là cache trình duyệt) nhằm mục đích cải thiện tốc độ load website sau truy cập đầu tiên.
Trong nội dung bài viết này, mình sẽ hướng dẫn bật Leverage Browser Caching trên hai nền tảng Web service phổ biến là Apache và Nginx (có tác dụng với tất cả các website trên server).
Cấu hình trên Apache
1. Tạo file expires.conf trong thư mục /etc/httpd/conf.d/ bằng lệnh:
# vi /etc/httpd/conf.d/expires.conf
2. Thêm nội dung bên dưới vào file và lưu lại.
<IfModule mod_expires.c>
# Turn on the module.
ExpiresActive on
# Set the default expiry times.
ExpiresDefault "access plus 2 days"
ExpiresByType image/jpg "access plus 1 month"
ExpiresByType image/gif "access plus 1 month"
ExpiresByType image/jpeg "access plus 1 month"
ExpiresByType image/png "access plus 1 month"
ExpiresByType text/javascript "access plus 1 month"
ExpiresByType application/javascript "access plus 1 month"
ExpiresByType application/x-shockwave-flash "access plus 1 month"
ExpiresByType text/css "now plus 1 month"
ExpiresByType image/ico "access plus 1 month"
ExpiresByType image/x-icon "access plus 1 month"
ExpiresByType text/html "access plus 600 seconds"
</IfModule>
3. Khởi động lại Apache service để những thiết lập mới có tác dụng.
# systemctl restart httpd
4. Kiểm tra lại module expires đã được nạp thành công bằng lệnh sau:
httpd -M | grep expires
expires_module (shared)
Cấu hình trên Nginx
1. Tạo file expires.global trong thư mục /etc/nginx/conf.d/ bằng lệnh:
# vi /etc/nginx/conf.d/expires.global
2. Thêm nội dung bên dưới vào file và lưu lại
location ~* .(js|jpg|jpeg|gif|png|css|tgz|gz|rar|bz2|doc|pdf|ppt|tar|wav|bmp|rtf|swf|ico|flv|txt|woff|woff2|svg)$ {
expires 30d;
add_header Pragma "public";
add_header Cache-Control "public";
}
Với giá trị expires 30d tương ứng với cache sẽ được lưu giữ trong tối đa 30 ngày – giá trị này bạn có thể tùy chỉnh dựa theo nhu cầu thực tế.
3. Tạo thư mục tùy biến cấu hình templates bằng cách thực thi lệnh bên dưới.
# mkdir -p /usr/local/psa/admin/conf/templates/custom/domain/
4. Copy file nginx template mặc định sang thư mục mới khởi tạo ở bước trên.
# cp -p /usr/local/psa/admin/conf/templates/default/domain/nginxDomainVirtualHost.php /usr/local/psa/admin/conf/templates/custom/domain/
5. Mở và thêm dòng bên dưới vào cuối file /usr/local/psa/admin/conf/templates/custom/domain/nginxDomainVirtualHost
include /etc/nginx/conf.d/expires.global;
Sau khi thêm, cuối file /usr/local/psa/admin/conf/templates/custom/domain/nginxDomainVirtualHost có dạng tương tự như bên dưới:
include /etc/nginx/conf.d/expires.global;
<?php if (is_file($VAR->domain->physicalHosting->customNginxConfigFile)): ?>
include "<?php echo $VAR->domain->physicalHosting->customNginxConfigFile ?>";
<?php endif ?>
}
6. Để thiết lập mới có tác dụng trên tất cả các domains hiện có trên server, bạn cần thực thi lệnh sau để cấu hình lại cho tất cả các domains.
# /usr/local/psa/admin/bin/httpdmng --reconfigure-all
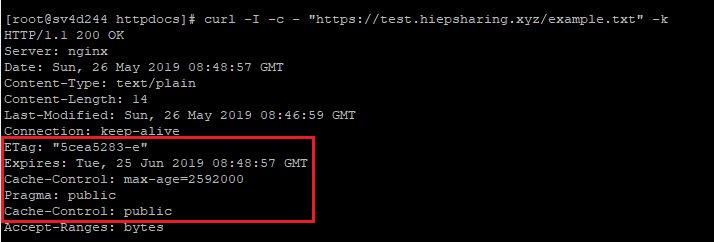
Sau khi quá trình reconfigure hoàn tất, bạn có thể kiểm tra lại kết quả thiết lập cache bằng cách thực lệnh curl với bất kỳ một file tĩnh nào đó
# curl -I -c - "https://example.com/example.txt" -k
Nếu cấu hình Leverage Browser Caching chính xác, sẽ hiển thị thông tin như hình bên dưới.

Cuối cùng, bạn có thể kiểm tra khả năng cache của Leverage Browser Caching bằng một số công cụ online như GTmetrix.
Chúc bạn thành công!


Để lại một phản hồi